Wednesday, December 21, 2011

Final (at this point)

Demo Instructions

Sorry the video's not the best, all I had was CamStudio, but below are all the instructions needed to demo on my lab computer 
Actual file hosted on website (815MB): http://kaitlinppollock.com/final.mov

To Demo shader as seen in video: 

Open Maya 
In python script line type "import shader" 
Add the appropriate files (C:\Kaitlin\SeniorProject\MaleModel\Textures)
Choose "Create Shader" -> shader created with name "skinOver"
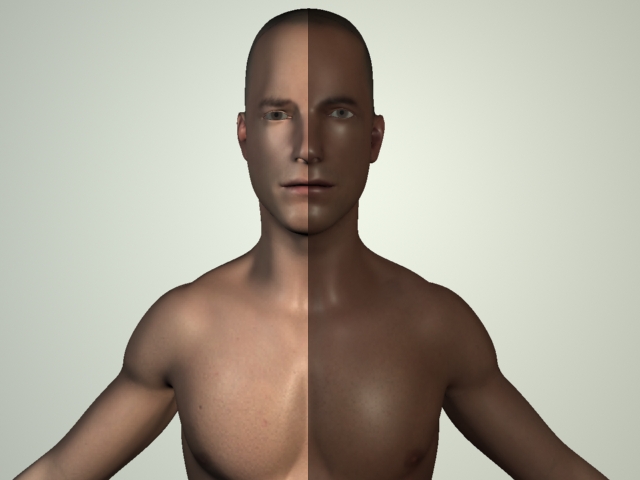
Apply to object -> Right Click -> Apply Existing Material -> skinOver 
If you added displacement this can be adjusted (no error checking at this point, so if no displacement file was selected please don't click)
To apply exhaustion progression -> Exhaust 
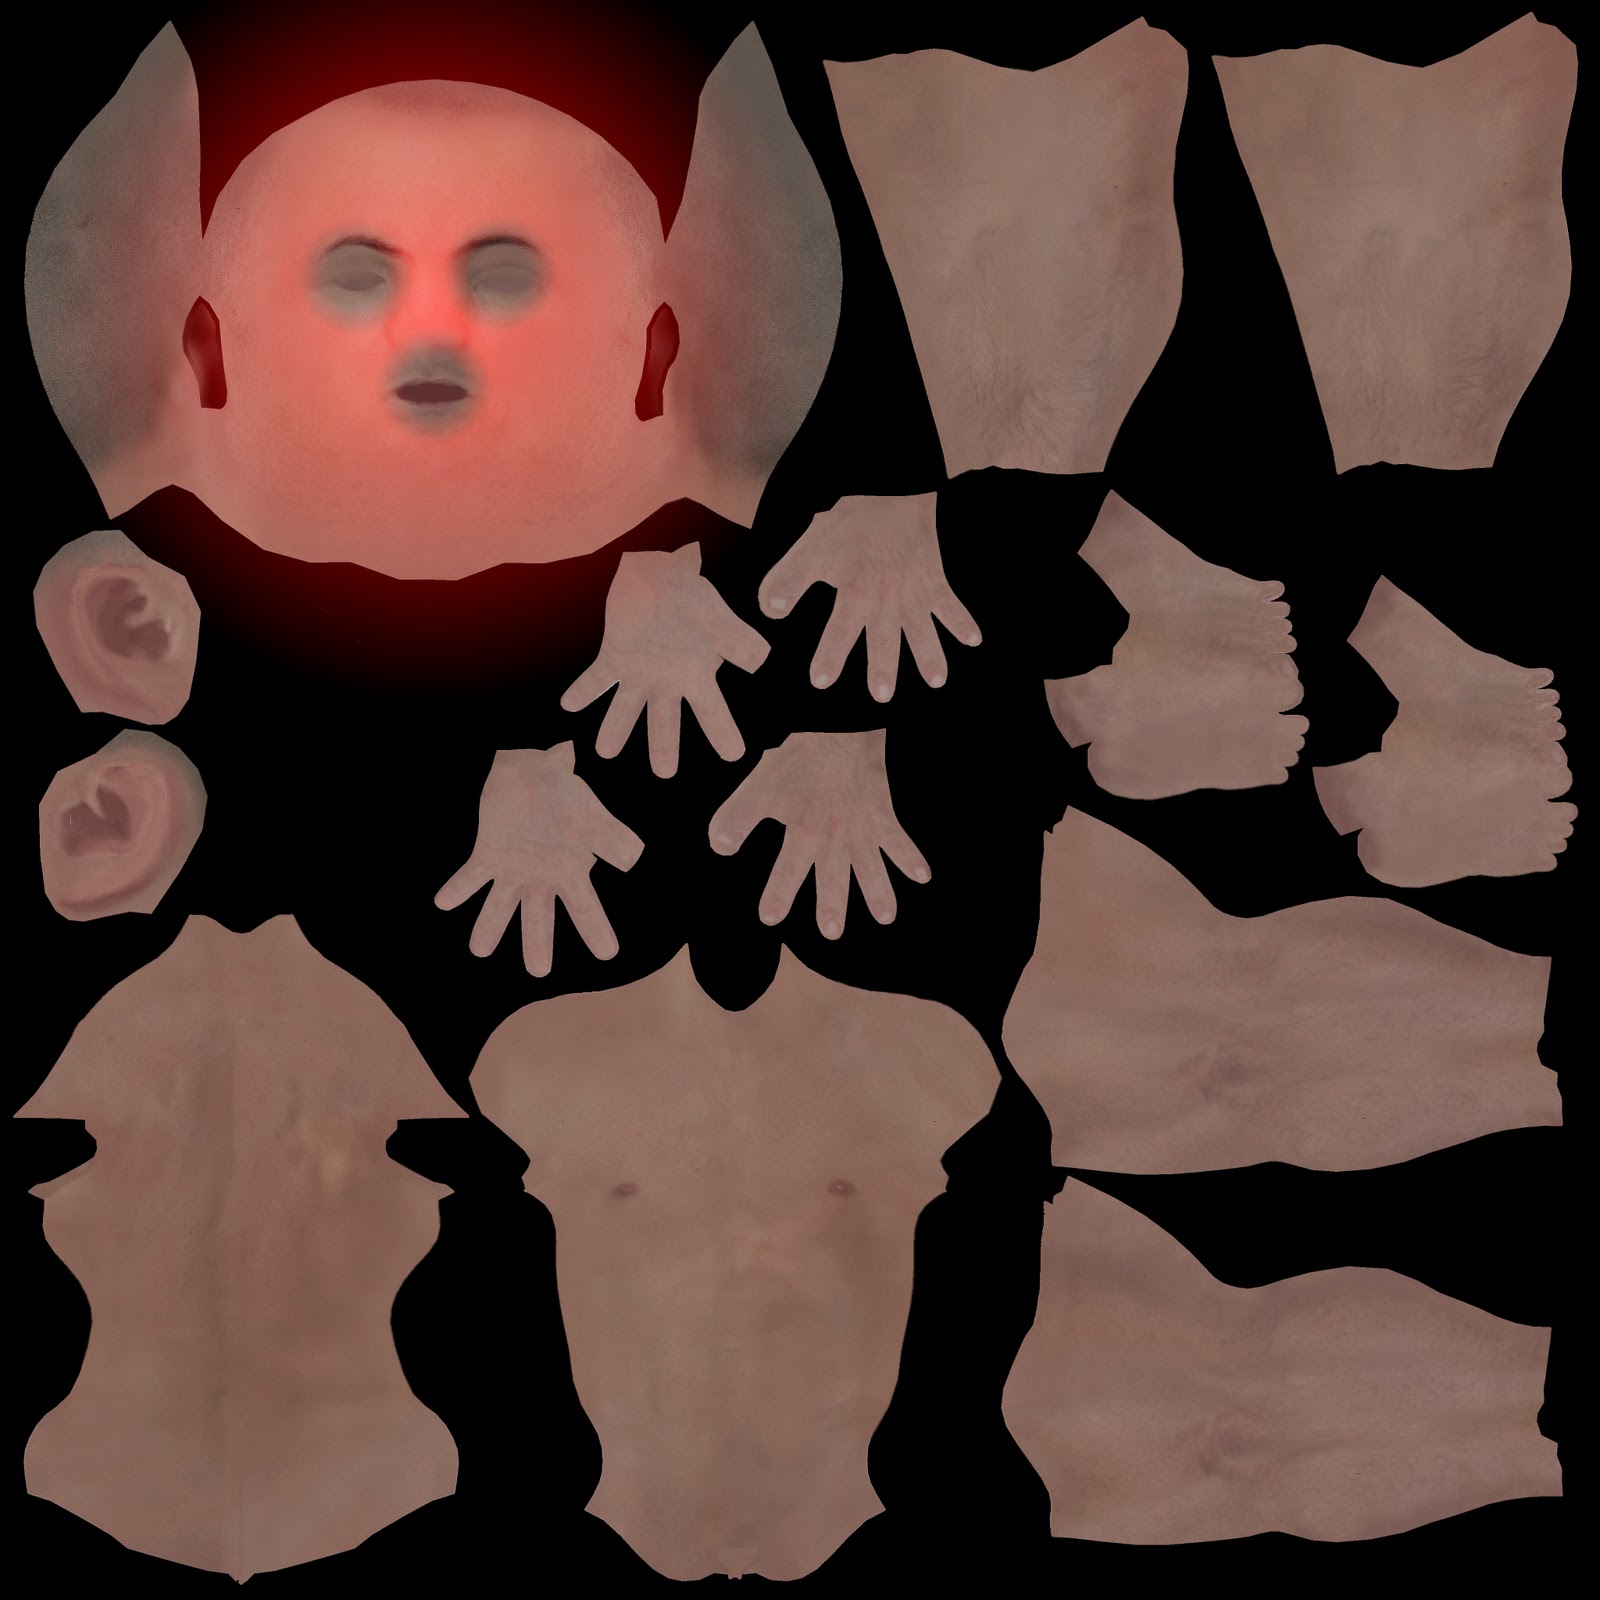
Images for Color, Epidermal, Subdermal, Backscatter will be shown if selected 
3 clicks, choose eyes and mouth -> hit Enter -> there will be a rather long wait as the files are generated 
Repeat for remaining file that pop up 
File ready (for demo purposes only every 10th frame created, so please view 0,10,20,etc -> 490) 


To Demo sweating 

Open Maya 
Select faces that you want to define the surface emitter 
In python script line type "import sweat" 
Wait 
Hit Play 


Code: 
C:\test 
C:\Users\Kaitlin\Documents\maya\2012-x64\scripts

Files:
C:\Kaitlin\SeniorProject

Sweating

Frustrated with the state of the exhaustion progression, I've moved over to the sweating system.
Moving along quite nicely :) let's just hope it stays that way. Currently the system is set up so that the user selects the faces of the face (or whatever area they want sweat to emit from), then run the script and it duplicates the object, deletes the faces that were unselected, make the new object a surface emitter, duplicate and scale up the emitter to make collider, and hide emitter and collider.

[EDIT 6:50pm]
Full system in place minus geometry instancing, progression, and tweaking of variables.

[EDIT 8:00pm]

References: 

Today's show: 3rd Rock from the Sun (Season2.24-26, Season3.1-10)

Tuesday, December 20, 2011

Exhaustion Progression

[1:30pm]
There are several ways I could have gone about this.
If I had wanted to be able to see the progression from Maya's preview window, I would have created all the progression images and the time slider would determine which image texture is shown. 
However, to avoid creating all those images, the progression can only be seen when rendered - the image is created just before being rendered. 
Here's a quick demo, increasing the radius by 100 each jump.
[EDIT 5:25pm]
My goodness, it's always the littlest things that cause the biggest problems.
I finally got the refresh image file working from my tester python script (since it's changing the file at each time step). However, transferring this over to my amalgamated script- still in python - it suddenly does not recognize the code. I tried a hack of reassigning the image file to the same image, hoping that would refresh it-- it did not. Finally got something working where it calls my tester script from the body script. (only works sometimes though... only worked that once....)

[EDIT 7:15pm]
Interesting discovery, the eval command runs fine on a file created manually, but not on a file created from the script, so where's the difference?

[EDIT 7:35pm]
So, it's because I was not connecting the 'place2d texture' node when creating the file node. Worked fine for display, but apparently needed for refreshing the file. So that's working, new typeError problem now. One of those fun ones where python doesn't know that your string is a string even with str() -resolved

[EDIT 8:25pm]
Issues again. The refresh works on the script generated file, but only if I've refreshed a manually made file first. ???? 20min later that's literally the only difference between when the refresh works and when it doesn't.

[EDIT 12:00am]
I have no idea what the issue is. No errors, it calls the functions fine, proper radii and locations and everything, edits the image, but the image doesn't actually change. I hate it. 


[EDIT 21Dec 10:00pm]
The refreshing issue is frustrating me to no end and I know I could spend days trying to debug it. But as this is due in a mere 2 hours, I'm going back to the memory intensive method based on something I've used before and so am fairly confident that it will produce sufficient results. 


Today's Show: 3rd Rock from the Sun (Season 2.1-23)

Monday, December 19, 2011

User Selection

So I finally got user selection working, of a sense.
Brings up a copy of the image at actual size and reads in three selection points. 
However, it does not apply these 3 selection points, but instead only puts the base red on the face. 
Wonderfully enough, it does show the image when called from within maya, although does not automatically exit from the image after hitting enter (as it does when you call it from the command line). As it still lacks any visual feedback this doesn't make it very intuitive. 
It also remains to be seen if it's reading in the selection points properly as it does not print out the positions.

[EDIT]
So issue. The cv window does not show the entire image, only what fits on the rectangular screen. However, the bottom corner still reads as the max height and width of the image. And as the window is supposed to autosize to the image I have no definite ratio to convert the coordinates...

[EDIT 10:45pm]
Got resizing working! Now I have a definite ratio to work with.

[EDIT 10:50pm]
generated by user selection! (not from within maya though, let's check that from maya too!)
note: delighted that the cv display works when called from within maya
however, if you write to a text file from the c++ code that does not work called from maya
(not necessary for this project so that's okay, but just a note)

References:
http://nashruddin.com/eyetracking-track-user-eye.html
http://linuxconfig.org/resize-an-image-with-opencv-cvresize-function

Today's show:
[19 Dec 2011] 3rd Rock from the Sun (Season 1)

Monday, December 12, 2011

Beta Review

Things slowed a little after Beta review as I rushed to catch up on my other school work, but now it's back on track and a race to get everything done by the deadline.
Some finagling with Visual Studio has allowed me to wrap my c++ code in a python module that will run in the windows environment. I now have an option in my maya script that allows you to "exhaust" the texture. Just switches out the textures at this point (no progression), but small steps first.

Goals:
-progression of exhaustion in Maya
-user selection
   .determine if running through python, c++, openCV
   .determine radius based on selection
   note: I have a feeling this will take longer than I want it to, and I may have to decide between continuing this or    
    moving on to other pieces of the project
-Sweating
   .gradient face selection
   .duplication of faces, scaling
   .creation of surface emitter
   .object-particle instancing
   .parenting

[EDIT 13 Dec 2011]
Notes from Beta (comments from Norm and Joe):
-specular based on ambient occlusion (more sweat builds up in creases of the body)
-face drained of color

Sunday, November 27, 2011

Demo Prep

Still don't have the swig code running from cmd or any python code called in a windows environment, so for now I'll just have to call it from cygwin.
-options for creation of many files that have the flush growing (basefile input), or a single image file (basefile input, radius)

Within Maya, open python command line
import shader (will only run once per session, after that Maya stores the code)
to run again reload(shader)
-choose appropriate files (default used if none chosen)
-adjust displacement if desired

Saturday, November 26, 2011

Fun with SWIG

Spent a long while trying to figure out user input from a mouse click. Looked into C++, openCV, and python options, none were working out very well so I've decided to leave that for now. I'll get the system working with text or argument input first.

I've been working and testing the code by just compiling the C++ code, time to make sure I can still swig it into python code. Still worked great just running from the mintty window, but then I tried creating a python file that would call the wrapped code. This proved more difficult that anticipated. In the wrapper commands I was somehow not creating the necessary file for the wrapped code to be treated as an importable module. Lots of googling and reading later I discovered distutils, a python setup file that takes care of all of the necessary flags, files, etc. It builds the file necessary to make an importable module and cuts down on my compilation code as well :
swig -c++ -python example.i
python setup.py build_ext --inplace

sorry no pictures this post :(

[EDIT: 27 Nov 2011]
Well I got a system in maya working that generates a wonderful SSS shader based on user selected images.
Went to build in the flushing generation and even though I got the import working yesterday apparently it only works in a Unix environment. Trying to run through a windows environment I'm back with the same "No module named _example" error...

References:
http://www.swig.org/Doc1.3/Python.html#Python_nn9 (31.2.2 - 31.2.6)


Python GUI References:
http://download.autodesk.com/us/maya/2010help/CommandsPython/textField.html
http://www.rtrowbridge.com/blog/2010/02/maya-python-ui-example/
http://download.autodesk.com/us/maya/2011help/CommandsPython/fileBrowserDialog.html
Good Code to Have: http://mail.python.org/pipermail/python-list/2010-August/1252307.html

Mouse Click Input References:
http://dasl.mem.drexel.edu/~noahKuntz/openCVTut3.html
http://www710.univ-lyon1.fr/~bouakaz/OpenCV-0.9.5/docs/ref/OpenCVRef_Highgui.htm#decl_cvSetMouseCallback
http://www.ida.liu.se/~ETE257/timetable/LecturePythonPygame2.html
GetCursorPos()
http://www.daniweb.com/software-development/cpp/threads/123456
http://www.cplusplus.com/forum/windows/21620/

Wednesday, November 16, 2011

Image Editing (Flush Growth)

No, it is not centered on his face. While testing I merely set the circle's center at pixel 1000,1000 
My next task will be to work on user selection, which will help determine the circle's center point.

[EDIT 18 Nov]

it might be a bit hard to notice at first, but this video shows the red growing in an "O" form, leaving the middle of the circle un-reddened. These un-reddened inner circles will be placed at the user selection points (both eyes and the mouth), so that these areas are not reddened, as can be observed. 

Tuesday, November 1, 2011

Image Editing (pt 2)

With help from Joe Kider, we got swig and openCV up working together nicely.
I'm working on writing the code in C++ using openCV, then using swig to wrap it in python.
Look I can make a red circle!
Now to add falloff..

[EDIT: 9 Nov 2011]
OMG
blended with the texture map to give:
although it's blending the black as well, which is making the texture much darker..

[EDIT: 10 Nov 2011]
OOH YEAHH


and bloopers!

Tuesday, October 25, 2011

Image Editing

Perfecting the look, texture, and lighting of Kenneth remains an ongoing project, but having reached a more acceptable state it's time to look at other elements of the project.

In order to have Kenneth, or any model, flush, I'll need the ability to change the colors in the given textures. I've started this process by downloading the Python Imaging Library (http://www.pythonware.com/products/pil/, http://www.pythonware.com/library/pil/handbook/introduction.htm), which allows me to read and write images.

Friday, October 21, 2011

Kenneth Bulks Up

Getting Kenneth to look right has been quite a struggle. But got through some pretty good progress today. Shout out to Dan Knowlton for finding the Alpha Gain settings that allowed us to tweak the displacement and bump maps.
(Because I can't resist a good blooper. Displacement not quite working..)
(Kenneth gets his muscles)

Tuesday, October 18, 2011

Building a More Robust SSS Shader

Most beautiful explanation I've seen: http://www.lamrug.org/resources/skintips.html

I can't seem to get the specular map working.
I've found several forum posts of people having this problem, but there's never any reply.

SSS_fast_skin -> mia_material x
(no specular)                                                                                                    (overall specular 0.1)

Got specular maps working by plugging them into the primary and secondary specular colors rather than the specular weights. Still not completely happy with it. The face especially looks rather plastic-y, but I believe that to be an issue with the bump map.


mia_material_x  magic (on the right, mia_skin, on the left, mia_skin feeding into material x)


Sunday, October 16, 2011

New Model

Working with on getting a new model put together. It came with more realistic textures than the previous model, but I have to put them together in Maya (originally built in LightWave)

Reference render:
Current state:
The bump maps aren't quite matching up in Maya.....

[Edit: 17 Oct, 10:00am] 
Now I've added the displacement map..

  
without Displacement                     with displacement 

[Edit: 17 Oct, 7:00pm] 
Yeah these look nice-ish, but it's not an SSS shader :( 


Friday, October 14, 2011

System Diagram

The first step of my project is looking at moving from the top system diagram to the bottom.
This relies on creating a more realistic skin shader, as described the in the previous post, and on the procedural generation of the the flushing textures. From Joe's suggestion I'm looking into reaction-diffusion textures to generate a flushing texture with a given position and fall-off.

Monday, October 3, 2011

Sub Surface Scattering

Joe wants the model to have a more realistic shader with more depth. Similar to the webGL shader pictured below. Jellyfish follow a similar pattern in how they are shaded. Both are created with a subsurface scattering shader; it's built up of multiple layers: the epidermal (skin), subdermal (blood basically), and backscatter (that red glow you get if you hold your hand over a flashlight), are the main physically based components.
The current model was built using Maya's misss_fast_skin, which has options for all of these. I also included a bump and specular map. Despite the fact that it was created using the SSS shader, it lacks the sense of depth that the above images show. 
I tried following this jellyfish shading tutorial.  But it did not provide the desired results.

Bonus: 
I want to add a bonus section to my blog posts. I always end up finding something awesome, but not immediately applicable, as I search for answers. This will allow me to keep track of these links for when they will be helpful.

Friday, September 30, 2011

Swig

Thanks to Matt Kuruc for directing me towards this
http://www.swig.org/ - "super easy way to generate python bindings for c++ code."

I already have quite a bit of code ready written in python.
I had been planning on converting it over to C++ with the aim of creating a maya plugin.
With this I might be able to keep a large portion of that existing code, which would be lovely.

Additional References: 
http://www.swig.org/Doc1.3/Python.html

Sunday, September 25, 2011

Shader Work

References:
http://www.mail-archive.com/python_inside_maya@googlegroups.com/msg04471.html
http://tech-artists.org/forum/showthread.php?t=1279
http://download.autodesk.com/global/docs/maya2012/ja_jp/PyMel/generated/pymel.core.rendering.html#module-pymel.core.rendering
http://autodesk.com/us/maya/2011help/CommandsPython/hyperShade.html 
http://autodesk.com/us/maya/2011help/CommandsPython/shadingNode.html
http://forums.cgsociety.org/archive/index.php/t-767023.html


Code:
So this is kinda working..
import maya.cmds as cmds
cmds.shadingNode('misss_fast_shader', asUtility=True, name='skin' )
but it's only creating it in the Work Area, not creating an actual shader, helpful for later though 

[27Sept]
Got it! Set asShader=True
cmds.shadingNode('misss_fast_shader', asShader=True, asUtility=True, name='skin' )
other options -asTexture -asLight -asPostProcess -asUtility

then to add a new texture to map
cmds.shadingNode('lambert', asTexture=True, asUtility=True, name='skin' )
so maybe I don't need the asUtility...?

Thursday, September 22, 2011

Shader Network

My plan is to begin with creating a script to build the necessary shader network. This is something that has been done before and so I believe it will be the easiest script to write. Many people have written such scripts and so searching for solutions will be infinitely easier. As opposed to searching for "maya sweating" which yields little helpful and requires a lot of google manipulation and sifting through unhelpful material. After the jump is the current SSS shader network used for the face. It is all built by hand and as you can see from the shear number of nodes and connections can be quiet time consuming. Joe (Kider) changed the name of one of my texture folders to fit with updates, and relinking all the textures was really quite fun. There are also other somewhat matching shaders to be built. And multiple files...

Monday, September 19, 2011

Redesign

Flushing
  • record data -> temperature sensor 
    • as external temperature decreases, flushing increases
  • need the face to flush (most notable)
  • need a shader network 
    • can be done by hand -> time consuming 
    • build script to create shader 
      • how do we identify areas of flushing? user input 
    •  flushing handled by blend box 
      • 0 = no flushing, 1 = full flush 
    • keyframe blend value based on temperature input 
      • start -> initial decrease = 0
      • min point = 1 (default adjustable) 
Sweating 
  • record data, GSR sensor 
    • sweat increases with GSR value 
  • need sweat to drip down the face 
  • build particle system 
    • again, time consuming to do by hand
    • need 3 pieces 
      • face geometry 
      • emitter (scaled copy of face geometry - hidden)
      • outer bubble (scaled copy of emitter - hidden)
        • acts as boundary so particles don't drift too far
    • face geometry indentified by user selection 
    • amount of sweat controlled by emitter rate 0 -> infinite particles/second 
      • begin -> initial increase: rate = 0
      • max point: rate = 15 (default, adjustable) 

Possible Skin Deformation

Input: Organs + Blend Shapes, Body Geometry 
1. Determine width/height of organs 
    • circle deformers radius = 1/16 width 
    • positioned at x = 0, w/3, 2w/3, w 
    • and y = 0, h/7, 2h/7, 3h/7, 4h/7, 5h/7, 6h/7, h 
2. Locators to match circle deformers 
3. Snap locators to organs -> geometry constraints 
4. Snap circle deformers to body geometry (no constraint) 
5. Parent circle deformers to locators 
6. Wire deformer -> object: body geometry, deformers: circle 
7. Keyframe blend shapes from data 


Wednesday, September 14, 2011

In the Beginning...

Abstract: Humans become visibly tired during physical activity. After a set of squats, jumping jacks or walking up a flight of stairs, individuals start to pant, sweat, loose their balance, and flush. Simulating these physiological changes due to exertion and exhaustion on an animated character greatly enhances a motion’s realism. We will present a user friendly application that quickly prepares a three dimensional model to display these effects of exhaustion.